All of us want our sensitive information to be hidden from people and for that we perform different kinds of things like hide those files or lock them using different softwares. But even though we do that, those files attractive people to itself as an object of security. Today I'm going to give you a slight introduction to what is called as Steganography. Its a practice of hiding an informational file within another file like you might have seen in movies an image has a secret message encoded in it. You can read more about Steganography fromWikipedia. In this tutorial I'm going to use a tool called steghide, which is a simple to use Steganography tool and I'm running it on myArch Linux. What I'm going to do is simply encode an image with a text file which contains some kind of information which I don't want other people to see. And at the end I'll show you how to decode that information back. So lets get started: Requirements: 1. steghide 2. a text file 3. an image file After you have installed steghide, fire up the terminal and typesteghide
It will give you list of options that are available. Now say I have a file with the name of myblogpassword.txt which contains the login password of my blog and I want to encode that file into an Image file with the name of arch.jpg so that I can hide my sensitive information from the preying eyes of my friends. In order to do that I'll type the following command in my terminal: steghide embed -ef myblogpassword.txt -cf arch.jpg
heresteghideis the name of the program embed flag is used to specify to steghide that we want to embed one file into another file -efoption is used to specify to steghide the name (and location, in case if its in some other directory) of the file that we want to embed inside of the another file, in our case its myblogpassword.txt -cfoption is used to specify the name (and location, in case if its in some other directory) of the file in which we want to embed our file, in our case its an image file named arch.jpg After typing the above command and hitting enter it will prompt for a password. We can specify a password here in order to password protect our file so that when anyone tries to extract our embedded file, they'll have to supply a password in order to extract it. If you don't want to password protect it you can just simply hit enter. Now myblogpassword.txt file is embedded inside of the image file arch.jpg. You'll see no changes in the image file except for its size. Now we can delete the plain password text file myblogpassword.txt. In order to extract the embedded file from the cover file, I'll type following command in the terminal: steghide extract -sf arch.jpg -xf myblogpass.txt
heresteghide is again name of the program extract flag specifies that we want to extract an embedded file from a stego file -sfoption specifies the name of the stego file or in other words the file in which we embedded another file, in our case here its the arch.jpg file -xfoption specifies the name of the file to which we want to write our embedded file, here it is myblogpass.txt (remember you must specify the name of file with its location if its somewhere else than the current directory) After typing the above command and hitting enter, it will prompt for a password. Supply the password if any or otherwise just simply hit enter. It will extract the embedded file to the file named myblogpass.txt. Voila! you got your file back but yes the image file still contains the embedded file. That's it, very easy isn't it? It was a pretty basic introduction you can look for other things like encrypting the file to be embedded before you embed it into another file and so on... enjoy :)
This blog post is aimed to express and explain my surprise about Signal being more secure than I thought (due to receipt acknowledgments). I hope you find it interesting, too.
Signal, and especially its state update protocol, the Double Ratchet algorithm, are widely known for significantly increasing security for instant messaging. While most users first see the end-to-end security induced by employing Signal in messaging apps, the properties achieved due to ratcheting go far beyond protecting communication against (active) attackers on the wire. Due to updating the local device secrets via the Double Ratchet algorithm, the protocol ensures that attackers, who temporarily obtain a device's local storage (on which Signal runs), only compromise confidentiality of parts of the communications with this device. Thus, the leakage of local secrets from a device only affects security of a short frame of communication. The exact duration of compromise depends on the messaging pattern among the communicating parties (i.e., who sends and receives when), as the state update is conducted during the sending and receiving of payload messages.
The Double Ratchet
The Double Ratchet algorithm consists of two different update mechanisms: the symmetric ratchet and the asymmetric ratchet. The former updates symmetric key material by hashing and then overwriting it with the hash output (i.e., k:=H(k)). Thus, an attacker, obtaining key material can only predict future versions of the state but, due to the one-wayness of the hash function, cannot recover past states. The asymmetric ratchet consists of Diffie-Hellman key exchanges (DHKE). If, during the communication, party A receives a new DH share gb as part of a message from the communication partner B, then A samples a new DH exponent a and responds with the respective DH share ga in the next sent message. On receipt of this DH share, B will again sample a new DH exponent b' and attach the DH share gb' to the next message to A. With every new DH share, a new DHKE gab is computed among A and B and mixed into the key material (i.e., k:=H(k,gab)). For clarity, I leave out a lot of details and accuracy. As new DH shares ga and gb are generated from randomly sampled DH exponents a and b, and the computation of gab is hard if neither a nor b are known, the key material recovers from an exposure of the local secrets to an attacker after a new value gab was freshly established and mixed into it. Summing up this mechanism, if an attacker obtains the local state of a Signal client, then this attacker cannot recover any previously received message (if the message itself was not contained in the local state), nor can it read messages that are sent after a new gab was established and mixed into the state. The latter case happens with every full round-trip among A and B (i.e., A receives from B, A sends to B, and A receives again from B).
Conceptual depiction of Double Ratchet in Signal two years ago (acknowledgments were only protected between client and server). The asymmetric ratchet fully updates the local secrets after one round-trip of payload messages.
Research on Ratcheting
During the last two years, the Signal protocol inspired the academic research community: First, a formal security proof of Signal was conducted [1] and then ratcheting was formalized as a generic primitive (independent of Signal) [2,3,4]. This formalization includes security definitions that are derived via 1. defining an attacker, 2. requiring security unless it is obvious that security cannot be reached. Protocols, meeting this optimal notion of security, were less performant than the Double Ratchet algorithm [3,4]. However, it became evident that the Double Ratchet algorithm is not as secure as it could be (e.g., recovery from exposure could be achieved quicker than after a full round-trip; see, e.g., Appendix G of our paper [3]). Afterwards, protocols (for slightly weakened security notions) were proposed that are similarly performant as Signal but also a bit more secure [5,6,7].
Protecting Acknowledgments ...
In our analysis of instant messaging group chats [8] two years ago (blog posts: [9,10]), we found out that none of the group chat protocols (Signal, WhatsApp, Threema) actually achieves real recovery from an exposure (thus the asymmetric ratchet is not really effective in groups; a good motivation for the MLS project) and that receipt acknowledgments were not integrity protected in Signal nor WhatsApp. The latter issue allowed an attacker to drop payload messages in transmission and forge receipt acknowledgments to the sender such that the sender falsely thinks the message was received. Signal quickly reacted on our report by treating acknowledgments as normal payload messages: they are now authenticated(-encrypted) using the Double Ratchet algorithm.
... Supports Asymmetric Ratchet
Two years after our analysis, I recently looked into the Signal code again. For a training on ratcheting I wanted to create an exercise for which the lines in the code should be found that execute the symmetric and the asymmetric ratchet respectively. Somehow I observed that the pure symmetric ratchet (only updates via hash functions) was nearly never executed (especially not when I expected it) when lively debugging the app but almost always new DH shares were sent or received. I realized that, due to encrypting the receipt acknowledgments now, the app always conducts full round-trips with every payload message. In order to observe the symmetric ratchet, I needed to temporarily turn on the flight mode on my phone such that acknowledgments are not immediately returned.
Conceptual depiction of Double Ratchet in Signal now (acknowledgments encrypted). The asymmetric ratchet fully updates the local secrets after an acknowledgment for a message is received.
Consequently, Signal conducts a full DHKE on every sent payload message (in case the receiving device is not offline) and mixes the result into the state. However, a new DH exponent is always already sampled on the previous receipt (see sketch of protocol above). Thus, the exponent for computing a DHKE maybe remained in the local device state for a while. In order to fully update the state's key material, two round-trips must be initiated by sending two payload messages and receiving the resulting two acknowledgments. Please note that not only the mandatory receipt acknowledgments are encrypted but also notifications on typing and reading a message.
If you didn't understand exactly what that means, here a tl;dr: If an attacker obtains your local device state, then with Signal all previous messages stay secure and (if the attacker does not immediately use these secrets to actively manipulate future conversations) all future messages are secure after you wrote two messages (and received receipt acknowledgments) in all of your conversations. Even though this is very (in practice certainly sufficiently) secure, recent protocols provide stronger security (as mentioned above) and it remains an interesting research goal to increase their performance.
Example of exploiting a single webcam entropy -b 1 -i [webcam's ip address and port] -v Example: entropy -b 1 -i 192.168.1.100:80 -v
Example of exploiting webcams from a list entropy -b 2 -l [file text] -v Example: entropy -b 2 -l iplist.txt -v
Example of exploiting webcams using shodan entropy -b 2 -v --shodan [you shodan api key] Example: entropy -b 2 -v --shodan PSKINdQe1GyxGgecYz2191H2JoS9qvgD
Entropy Toolkit disclaimer: Usage of the Entropy Toolkit for attacking targets without prior mutual consent is illegal. It is the end user's responsibility to obey all applicable local, state, federal, and international laws. Developers assume no liability and are not responsible for any misuse or damage caused by this program. Entropy Toolkit license:MIT license.
A bug bounty program, also called a vulnerability rewards program (VRP), is a crowdsourcing initiative that rewards individuals for discovering and reporting software bugs. Bug bounty programs are often initiated to supplement internal code audits and penetration tests as part of an organization's vulnerability management strategy.
Many software vendors and websites run bug bounty programs, paying out cash rewards to software security researchers and white hat hackers who report software vulnerabilities that have the potential to be exploited. Bug reports must document enough information for for the organization offering the bounty to be able to reproduce the vulnerability. Typically, payment amounts are commensurate with the size of the organization, the difficulty in hacking the system and how much impact on users a bug might have.
Mozilla paid out a $3,000 flat rate bounty for bugs that fit its criteria, while Facebook has given out as much as $20,000 for a single bug report. Google paid Chrome operating system bug reporters a combined $700,000 in 2012 and Microsoft paid UK researcher James Forshaw $100,000 for an attack vulnerability in Windows 8.1. In 2016, Apple announced rewards that max out at $200,000 for a flaw in the iOS secure boot firmware components and up to $50,000 for execution of arbitrary code with kernel privileges or unauthorized iCloud access.
While the use of ethical hackers to find bugs can be very effective, such programs can also be controversial. To limit potential risk, some organizations are offering closed bug bounty programs that require an invitation. Apple, for example, has limited bug bounty participation to few dozen researchers.
Purpose of Hacking? . Just for fun .Show-off .Steal important information .Damaging the system .Hampering Privacy .Money Extortion .System Security Testing .To break policy compliance etc
Hoy os traigo el III Encuentro Virtual de 0xWord que os he subido a mi Canal Youtube. En estas reuniones a través de Internet durante esta época de confinamiento los participantes hablan de temas que tienen que ver con la especialidad de los profesionales que se juntan. En esta ocasión, el encuentro ha juntado a Amador Aparicio, Felipe Colorado, Fran Ramírez y Pablo González.
Figura 1: III Encuentro Virtual de 0xWord: Formación en Ciberseguridad e IA
Como sabéis, Pablo González ha enfocado su carrera a la ciberseguridad, especialmente en el área del Ethical Hacking, donde ha escrito muchos libros de 0xWord con esta temática, como son los libros de:
Pero también ha colaborado en otros títulos e incluso escrito una novela en la que mezclan acción y hacking como es Got Root que escribió junto a Felipe Colorado, otro de los participantes de este encuentro. Felipe, además de esa, ha publicado las novelas de Cluster y Crime Investigation, donde se narran aventuras basadas en el trabajo de los analistas forenses. Pero además tiene otras novelas más allá de 0xWord como son Baldur: El ocaso de III Reich y Om: La montaña roja.
Todos ellos se juntaron en este III Encuentro Virtual de 0xWord para hablar de temas tan importantes como la formación en ciberseguridad, la pasión por lo que haces, como aprender hacking y el mundo de la Inteligencia Artificial. Más que recomendable para conocer sus opiniones de primera mano.
Y para terminar, os recuerdo que durante lo que queda de mes tenéis los libros de 0xWord - incluidos los de los todos los que han participado en todos estos encuentros virtuales - con un descuento.
Desde hoy, y durante las próximas dos semanas en @0xWord hemos puesto un descuento de un 10% de descuento con el código YOMEQUEDOENCASA en todos los productos, y hemos rebajado un 5% los VBOOKS (Cursos Virtuales). Por favor, colaboremos con quedarnos todos en casa.
macSubstrate is a platform tool for interprocess code injection on macOS, with the similar function to Cydia Substrate on iOS. Using macSubstrate, you can inject your plugins (.bundle or .framework) into a mac app (including sandboxed apps) to tweak it in the runtime.
All you need is to get or create plugins for your target app.
No trouble with modification and codesign for the original target app.
No more work after the target app is updated.
Super easy to install or uninstall a plugin.
Loading plugins automatically whenever the target app is relaunched.
Providing a GUI app to make injection much easier.
System Integrity Protection is a new security policy that applies to every running process, including privileged code and code that runs out of the sandbox. The policy extends additional protections to components on disk and at run-time, only allowing system binaries to be modified by the system installer and software updates. Code injection and runtime attachments to system binaries are no longer permitted.
Usage
download macSubstrate.app, put into /Applications and launch it.
grant authorization if needed.
install a plugin by importing or dragging into macSubstrate.
launch the target app. step 3 and step 4 can be switched Once a plugin is installed by macSubstrate, it will take effect immediately. But if you want it to work whenever the target app is relaunched or macOS is restarted, you need to keep macSubstrate running and allow it to automatically launch at login.
uninstall a plugin when you do not need it anymore.
Plugin macSubstrate supports plugins of .bundle or .framework, so you just need to create a valid .bundle or .framework file. The most important thing is to add a key macSubstratePlugin into the info.plist, with the dictionary value:
Key
Value
TargetAppBundleID
the target app's CFBundleIdentifier, this tells macSubstrate which app to inject.
Description
brief description of the plugin
AuthorName
author name of the plugin
AuthorEmail
author email of the plugin
Please check the demo plugins demo.bundle and demo.framework for details. Xcode Templates macSubstrate also provides Xcode Templates to help you create plugins conveniently:
Launch Xcode, and there will be 2 new plugin templates for you.
Security
SIP is a new security policy on macOS, which will help to keep you away from potential security risk. Disable it means you will lose the protection from SIP.
If you install a plugin from a developer, you should be responsible for the security of the plugin. If you do not trust it, please do not install it. macSubstrate will help to verify the code signature of a plugin, and I suggest you to scan it using VirusTotal. Anyway, macSubstrate is just a tool, and it is your choice to decide what plugin to install.
YardStick One Unleashed, Automating RF Attacks In Python - An RFCat Primer
I decided to dive into our current device a bit more before moving on to a new device, and really ramp up the skillsets with RFCat and the Yardstick.So for this blog you will need our previous Target and a Yardstick One. We will be hacking everyting using only the Yardstick and Python.
So last time we scanned for signals with GQRX and a Software Defined Radio device. We took the demodulated wave forms in Audacity and discerned what the binary representation of our wave forms were by decoding them manually. We then transferred those into a hex format that our yardstick understood.However there is a way to do everything with our Yardstick. It will require a bit more understanding of the RFCat library, and a bit of python.
This blog will be your RFCAT primer and coding tutorial, but don't be scared with the word "Programming" I will be using simple code, nothing complicated.So if your a programmer, tune out any coding explanation and understand RFCat, if your not a coder, then use this as a jumping point to start making some quick python scripts for hacking.
Video Series PlayList Associated with this blog:
The first thing we did in our last blog after looking up the frequency was to open up GQRX and check if we can see our devices signals. As it turns out you can actually do this in python with RFCat. Which is really convenient if you left your Software Defined Radio dongle at home but happen to have access to a Yardstick.
RFCat as a Spectrum Analyzer:
In order to use RFCat as a spectrum analyzer we need to make sure we have RFcat installed and a few prerequisites such as python and PySide modules.I actually did this inside of an Ubuntu VMware because Pyside was giving me issues on OSX and I didn't feel like trying to fix it. So If you spin up an ubuntu vm you can do the following to get things up and running..
Install Spectrum Analyzer PreReqs:
sudo pip install PySide
sudo apt-get install ipython
Plug in your adapter and type in the following:
rfcat -r
d.specan(315000000)
You will then see the below output of RFCat Specan running in the 315 MHz range.
Click our doorbell, or trip the motion sensor and you will see a frequency spike as shown in the second picture.
This is similar to what you saw in GQRX but all with your Yardstick and the Python RFCat library.
So everything seems to be working and we can see our devices transmitting on the 315MHz frequency.Unfortunately we have no record button on Spescan. This leaves us to dive a little deeper into RFCat. We will see what RFCat can do for us in the recording and sniffing capacity.
Sniffing RF Data With The YardStick and Python:
In RFCat there is a simple listening command in our interactive session which will give us an idea of what is being transmitted and in what type of data format we are recieving. When using GQRX we received a WAV file, but what does RFCat give us?One thing I have realized over the years is programming is all about dealing with data in various formats and figuring out how to parse and use it in various implementations. So the first thing we have to figure out is what kind of data we are dealing with.
Lets hop back into RFCat and set a few parameters so the yardstick knows to listen on 315MHz and to use ASK modulation.The settings below should all be familiar from our last blog with an exception of "lowball" which configures the radio to use the lowest level of filtering. We basically want to see everything but may experience some noise by not filtering it out.. For example before you hit your doorbell button you may see random FF FF FF FF data outputted to the screen.
Below is the cmdline input needed and some example output. After all of our settings are in place we can use RF.listen() to start listening for everything in the 315000000 frequency range and have it output to the screen.
After you set it up, you can press the button on your doorbell and you will receive the following output. We have lots of zeros and what might be some hex output.
Destroy ficti0n$rfcat -r
>>> d.setFreq(315000000)
>>> d.setMdmModulation(MOD_ASK_OOK)
>>> d.setMdmDRate(4800)
>>> d.setMaxPower()
>>> d.lowball()
>>> d.RFlisten()
Entering RFlisten mode...packets arriving will be displayed on the screen
If you hit "ENTER" in your terminal you will stop receiving packets and drop back into a python interactive terminal. If we take a look at the repeating pattern in the above output, it looks like some random patterns and then a repeating pattern of, 84e708421084e738.If we convert that to binary we can compare with what we decoded WAV from our previous blog.
Since we are already in a python terminal you can type the following to see the binary representation:
Lets break that up into 8 bit bytes and compare it to our previous blogs binary, hmm its lot different then what we originally decoded the signal to be:
If we take the above capture data and format it correctly for RFcat with the replay code from the last blog. When we send it over, it does indeed ring the doorbell, thats interesting. A completely different value in both hex and in binary and still we get a doorbell to ring. So the variance we talked about last time extends a bit more. Below is the code with the new hex from the capture data:
I will also take a minute to note something before we continue. I had a little trouble at first when using a telescopic antenna in RFcat and the YardStick.So I will list those issues below as notes for you to play with if you run into random looking captures when pressing your doorbell button.
When using a telescopic antenna closed I had almost repeating output with some random bits flipped
When extending the antenna it went crazy output with random noise
I then used a small rubber ducky antenna and got the repeating output shown above.
What we have done so far:
So above, we managed to figure out the following all in RFCat
Verify the frequency with RFCat
How can I listen for it and capture a transmission with RFCat
How can I send this transmission with RFCat
We have basically eliminated the immediate need for the graphical tools that we were using in the last blog. Not to say that they are not useful. They absolutely are, and we should use them often and know how to work with all kinds of formats and understand everything.. However, if we are living in a reality that all we have is a Yardstick and no other tools. We are not helpless and we can still kick some serious RF butt.
Now we are going to take this a bit further so we can learn some more about RFCat, Python and mistakesI made when trying to automate this stuff. I found some interesting quirks I had to work through and I would like to save others some time who are also in the learning process as I am.
Using RFrecv() for Listening:
Ok first thing I learned is that RFListen() is not all that useful when it comes to automating this stuff. I tried to set its output to a variable but that did not seem to work.. So instead we will be working with another feature that lets us listen and that is RFrecv().If we fire up our RFCat in the terminal again we can give that a try:
Destroy:~ ficti0n$ rfcat -r
>>> d.setFreq(315000000)
>>> d.setMdmModulation(MOD_ASK_OOK)
>>> d.setMdmDRate(4800)
>>> d.setMaxPower()
>>> d.lowball()
>>> d.RFrecv()
Traceback (most recent call last):
File "", line 1, in
File "/Library/Python/2.7/site-packages/rflib/chipcon_nic.py", line 1376, in RFrecv
data = self.recv(APP_NIC, NIC_RECV, timeout)
File "/Library/Python/2.7/site-packages/rflib/chipcon_usb.py", line 664, in recv
raise(ChipconUsbTimeoutException())
ChipconUsbTimeoutException: Timeout waiting for USB response.
OK thats not cool we are getting a weird error if we don't get a signal right away regarding ChipconUsbTimeoutException.
No problem since we are in a python terminal we can just capture this exception and pass it, then continue with sniffing.This is done with a Try/Except block.
try:
... d.RFrecv()
... except ChipconUsbTimeoutException:
... pass
...
That looks a little better, I am no longer receiving errors, but lets put this in a loop so we are continuously listening with RFrecv() and press our doorbell so we can capture our doorbell signal.Below is the output of a random signal that came in followed by our doorbell.. but its all kinds of crazy looking and a bit hard to read:
try:
... d.RFrecv()
... except ChipconUsbTimeoutException:
... pass
...
while True:
... try:
... d.RFrecv()
... except ChipconUsbTimeoutException:
... pass
Lets try to fix the output a little and make it more readable by encoding it before we view it. Open up your text editor and use the following code.What we are doing here is simply setting up our listener as we did before and then setting it to a variable we can use.
Line 12: Setting our RFrecv() output to the variable y and z. The y variable is the output that we want
Line 13: We will wrap the y variable with an encode function to encode it with a HEX encoding.
Line 14: After that we just print it out.
When we run this script from the command line we will get a much nicer output shown below, much like we did with the RFlisten function above. The big difference being that our data is now set to the variable "capture"on line 13 and we can do what we want with that data. For example we can directly replay that data rather then manually performing the actions.
Parsing and replaying data:
This actually took me a bit of time to figure out, so we need to do a few things to get this to work:
We need to parse out the data from the surrounding 0s
We need to convert it to a format we can send (tricker then it sounds)
We need to add padding and send that data over (We know how to do this already)
Parsing Data:
So with this I first tried all kinds of regular expressions, but for some reason the inverse of more then 3 zeros in a row does not seem to work. I am no regex master but that seemed like it should be working. I then tried a few creative solutions reducing repeating zeros down to pairs that I could split on with string functions. This actually worked well but then my buddy showed me this which was more efficient:
re.split ('0000*', capture)
All this is doing is using the regex library to parse on a set of 4 or more zerosand return whats left in a list of useable hex data for sending.So lets add that into our code and give it a try to see what we get back. I made the following code changes:
Line 2: Import the Regex library
Line 11: We defined the capture variable so we can access it outside of the Try Block and the loop
Line 21: We created a payloads variable and created a list from the capture file of non 0000 blocks
Line 22: We print out our list of useable payloads which can been seen in the below output
Data Format Woes:
So we have data in a list we can pull from, thats awesome but I ran into a few issues. I first tried to parse this data into the \x format we normally used when sending our attack payloads manually, but that actually does not work. Reason being that if I use a code snippet like the following to convert this data into the right format everything looks ok and something like this \x84\xe7\x08\x42\x10\x84\xe7.But it won't actually work when I send it with RFCat. For some reason when you paste in your own hex its in a different format then if you programmatically create hex like below. You don't really need to understand the code below, just know it takes our payload and creates the hex in a visual format to what we used in the last blog:
DON'T USE THIS.. IT WONT WORK!!!
for payload in payloads:
formatted = ""
if (len(payload) > 6) and (len(payload) % 2 == 0):
print "Currently being formatted: " + payload
iterator = iter(payload)
for i in iterator:
formatted += ('\\x'+i + next(iterator))
else:
continue
Formatted Hex Vs Manually Pasted Hex
So lets compare the outputs of our manually created Hex String versus what we get when we format with the above code
Below is the output of the following:
Your encoded capture
Your parsed payloads in a nice list
Your payload being processed into hex.
But this is where things go wrong, you then have :
Your nicely formatted Hex created by your code above (Yay for us)
Then you have your manually pasted in hex from your original attack payloads as unprintable characters(What?)
You can clearly see there is a major difference between when we manually paste in our hex like we did in the last blog and when we create it from our capture file.This led to another sleepless night of researching whats going on. I did a bunch of troubleshooting until I found some code on the RFcat site and saw it using the BitString library and something called BitArray.The examples for this library were using binary data instead of hex and then converting it.
BitString BitArray Formating FTW:
If you remember above we created binary input with some python, so lets use that code in our current program template and then feed it into byteArray and see what happens. We can install bitstring with the following:
Install Bitstring:
sudo pip install bitstring
Our New code using BitString:
Line 2: I imported bitstring
Line 25: I added a for loop to go through our payload list one by one
Line 27: I convert our current payload to binary
Line 28: I take that binary and I feed it into bitstring to fix the formatting issues
Lines 29-30:Print out our binary and our new data that match our manually pasted data format, shown below
With these conversions the data above looks like its correct to attack our target devices. I know this seems like a lot of steps, but honestly this is only 50 lines of code in all to automate our replay attacks in a simple way.It is also very easy if you know what your doing and don't spend all of your time figuring it out like I did. You just need to understand how to work with the types of data each component understands.
With this latest code update we are ready to send our code with a simple modification to our RFxmit line from the last blog. We will now change RXxmit to take our formatted variable and then append our padding:
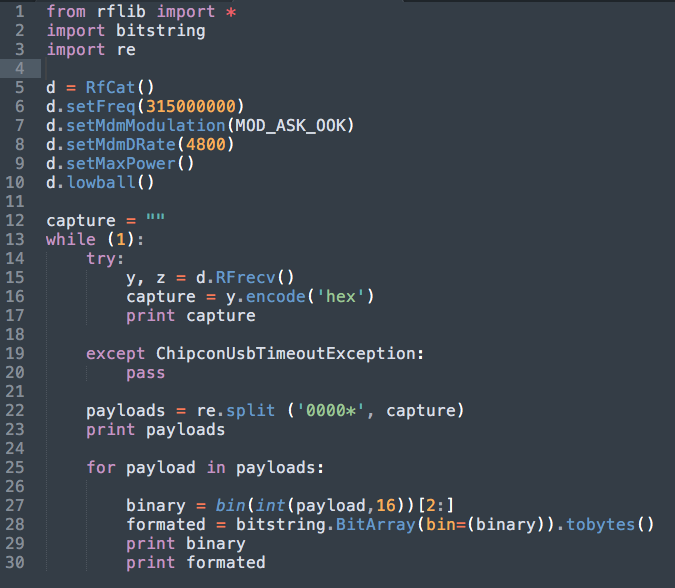
Below is our full code to automate this attack, with a few changeups, but not many.. Really all I did was add some conditional statements to limit our data to longer payloads that are divisible by 2 since our hex takes 2 string characters for example \x41 is the string character 4 and 1.I originally did this for the iterator code which required the proper amount of characters but decided to leave it since it makes sense anyway.I also set it so that if there is a capture it breaks out of the loop. This way we are not continuously attacking every transmission we see. Instead for our testing we can hit our doorbell, replay all the values before our script finishes and exits.
Note: I sent similar code to a friend and had him run it against a black box real world target. He had permission to attack this target via the owner of a facility and it worked flawlessly. So although a doorbell is a trivial target. This same research applies to garages, gates, and any other signal not using protection mechanism such as rolling code, multiple frequencies at once etc.
Also note that when you run this, almost all of the payloads in your list will ring the doorbell which is why I put a timing variable before the sending command. This way your doorbell isn't overburdened. I already broke a few of these devices during testing LOL.
I have since modified this code to be more effective, and have additional features and more niceties, I will release that code when its ready.. For now enjoy the below code and hit me up with any questions or comments.
I hope this blog is helpful in demystifying RFCat in order to successfully perform/automate attacks with only Python and your Yardstick One. This is essentially a few nights of my research posted here for everyone to learn from. Because it was a pain to find useful information, and I would like to save other people a lot of sleepless nights. I am by no means the master of RF or RFCat, there is tons more to learn. Up next I will get back on track with a real world attack against a device and creating our own keyfobs to replay our attacks in the future.